Modifications made to
the car...
Click on the images to enlarge.
 Eibach Lowered Suspension Kit Eibach Lowered Suspension Kit
(Mazda part number : 410077774)
This kit
is offered by Mazda as a dealer fit option. It
lowers the car by about 35 mm and firms up the
suspension a bit to reduce body roll. I had this
installed by the dealership prior to collection. The
kit is available from
MX-5 Parts
however for quite a bit less than Mazda charge.
However Mazda's price includes fitting, and as I
wanted the car to be ready to drive away straight
away, and not need to go elsewhere
 to
have them fitted, I plumped to pay that bit more and
have them do it. Plus I was concerned that
aftermarket springs from a 3rd party supplier may
raise issues with the Mazda 3 year warranty. The car
now looks how I envisage it should from the factory.
The wheels fill the arches better and the car looks
much less like a 4 x 4! The handling does not suffer
as a result, and it feels more composed now in the
corners with considerably less body roll. to
have them fitted, I plumped to pay that bit more and
have them do it. Plus I was concerned that
aftermarket springs from a 3rd party supplier may
raise issues with the Mazda 3 year warranty. The car
now looks how I envisage it should from the factory.
The wheels fill the arches better and the car looks
much less like a 4 x 4! The handling does not suffer
as a result, and it feels more composed now in the
corners with considerably less body roll.
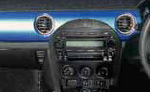
Dashboard Trim
Panel
(Mazda part number : NE64V1190F94)
I decided on the dash panel after my test drive of a
1.8 car (with option pack) it didn't have the black
leather that my car has, but did have the 'piano
black' dashboard trim. While there wasn't anything
major wrong with the existing dash panel, I did feel
it would show fingerprints very easily and probably
scratch easily. I also felt the interior, being
predominantly black, was a bit dark, so this would
liven up the interior and give it a bit more
interest. Having not seen this in the flesh this was
a bit of a gamble, but I am thoroughly pleased with
how it looks, and would recommend this mod to
everyone. Click here for an actual shot of the
Winning Blue dash panel.
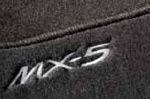 Tailored Luxury
Carpet Mat Set Tailored Luxury
Carpet Mat Set
(Mazda part number : NE64V0320)
The mats were a necessity and sadly not something
that the car comes with as standard. Couldn't even
get them as a freebie (did get a tank of fuel though
- whoopee). The mats are tailored to fit the funny
shaped footwell and the drivers side one screws to a
bracket on the floor. There is no heel pad however,
so not sure how long these will actually last.
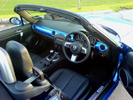
 Clear Side Repeater
Lenses Clear Side Repeater
Lenses
(mx5parts.co.uk
part number IL0086)
The ONLY part carried over from the previous MX-5's
(according to Mazda's marketing material) was the
orange side indicator lense. No idea's why they kept
it orange as most people change it to clear, and it
did look out of place on the car. This was my first
unofficial mod and I'd bought them to put on before
anyone even saw the car. The photo above showing the
car with the lowered suspension shows the side
repeater lenses in place.
 Mud
Flaps Mud
Flaps
Mazda part number :
NE85V3450F / NE85V3460F)
I considered buying mud flaps as an option from the
dealership, but when I realised that inc fitting
they were to come in at over £300(!) I decided not
to bother. I bought mine from Mazda South in the USA
www.mazdastuff.com. In total, inc shipping and a
bit of import duty they came to £175 - quite a
saving on UK costs. They took me around an hour to
fit being careful, but if I were to have to do it
again it would probably take 30 mins max. The mud
flaps are only very small and as they are body
colour blend well without looking too 'bolt on'.
 Stereo (Amplifier
/ Speakers / iPod) Stereo (Amplifier
/ Speakers / iPod)
The standard fit single disc system in the MX-5
is actually pretty good for a manufacturer supplied
unit. (I believe it's manufactured by Sanyo!) I have
standard head unit in my car, not the BOSE version
(which is virtually identical head unit wise, its
mainly just the speakers, additional amplification
and the addition of auto top down sensing EQ
adjustment that differ). I
was pretty impressed with the stereo and speakers
when played from relatively quiet to fairly decent
levels (on CD). Too loud though and the lack of
amplifier power becomes evident and it begins to struggle to power the speakers and
distortion starts. Sadly the performance on FM is nowhere
near as good as CD and the EQ settings have to be
messed with to get FM to sound anything like as
decent sounding as CD. This is a flaw of the head
unit though and not something that can be remedied
other than EQ tweaking.
Now I was used to
something with a bit more 'oomph' as my
old Roadster had two 8"
subwoofers in the rear deck, component front
speakers and some fairly decent amplification on
board, so I was aiming to achieve similar
performance in the new car.
I decided I wanted to keep the OEM look and I didn't
want a mismatched interior with aftermarket head
unit. It just seemed an invite to a thief if they
see a DIN unit in place of the OEM one, much easier
to pinch, and who wants an OEM Mazda stereo?
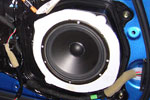 Speakers Speakers
I have replaced the standard 5x7 door mounted woofer
and door mounted tweeters with a pair of Boston
Acoustic 6.5" RC61LS
component speakers.
I had to make some baffles to
hold the new speakers with them being a different
shape (see image).
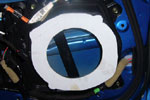 I also added some Dynamat
Sound Deadening both in the doors themselves, and
also around the speakers where they and the baffles
mount to the door. The crossovers were also mounted
within the door, but the dry side of the door -
behind the door card. I also added some Dynamat
Sound Deadening both in the doors themselves, and
also around the speakers where they and the baffles
mount to the door. The crossovers were also mounted
within the door, but the dry side of the door -
behind the door card.
The replacement speakers are
superb, with much deeper bass and a more integrated
treble. The exising speakers were a bit lacking in
depth and clarity and these improve things 100%!
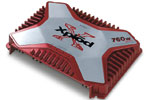 Amp Amp
I also
added a SONY amplifier that I've managed to locate
underneath the passenger seat. It just fits under
the seat rails without sliding about and hasn't
generated too much heat to be a concern yet.
The wiring goes from
under the passenger seat forward into the engine bay
under the door sill covers and also forward to the
head unit under the centre tunnel/console.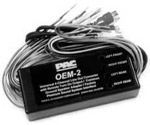
The SONY amp is connected to
the head unit via a speaker level to line level
adapter by US company
Pacific Audio, and the unit itself is called a
PAC-OEM2. This takes the speakers level output
of the headunit (just using front two speaker
outputs) and converts them to a line level for the
amplifier to use. It is adjustable for level, and
has delay feature to stop any pops when the amp
turns on. The OEM 2 is located to the right of the
stereo behind the dash.
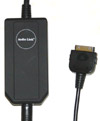 Ipod Ipod
Having only just joined the iPod generation I
decided to join with a bang and now have my entire
music collection on my 80gb iPod Video (give or take
twenty or so cd's that I can't find). This connects
directly to the head unit via the 'Audio Link'.
This
I bought from
The RPM Store in the United States. I
had bought one from mx5parts in the UK but had three
versions none of which I could get to work. The RPM
Store promised they had the latest revision of the
unit and that it would work. It did, although I've
since heard from mx5parts that they now how the
latest revision, which works with the mk3.
The Audio Link connects to an
existing socket on the rear of the headunit and is
then fed via the centre console/tunnel to the
sliding cubby box, where it exits and connects to
the iPod. There are some very good instructions for
installation on
the mx5.com forum.
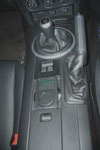 As
seen to the right the iPod is in a rubber case, and
sits perfectly on the opening of the sliding
compartment. This location gives me easy access to
the scroll wheel and I can easily see what is playing. As
seen to the right the iPod is in a rubber case, and
sits perfectly on the opening of the sliding
compartment. This location gives me easy access to
the scroll wheel and I can easily see what is playing.
The quality of the audio using
the Audio Link iPod connection is extremely good,
and way way superior to any FM transmitters such as
the Griffin iTrip. The sound is on a par with CD and
again that means it needs the EQ tweaking if
flicking from FM to iPod.
The steering wheel controls
and head unit controls allow you to change track on
the iPod, or it can be placed in Playlist Mode which
allows selection of playlist via the head unit
preset buttons.
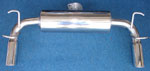
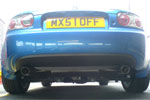 Exhaust (Sept '06) Exhaust (Sept '06)
One of my biggest concerns about the new car was the
noise it made - or lack of! Its got a cracking 2.0 litre
engine but, in my opinion, sometimes sounds like a
'Flawed Mondeo'. Both my old Roadsters had a decent
burble and quite a throaty roar on WOT (wide open
throttle) due to slightly ageing exhausts and a K&N
induction kits.
So the decision was made that when a back-box I was
happy with was made available in the UK I'd replace
mine. After all its only a case of removing two
bolts and dropping the old back box off, then
replacing this with the new one. You don't even have
to jack up the car to do it. I was concerned about
the dealership being funny with me about this, in
terms of warranty, so may even replace it with the
old one when it has it's annual service.
Unfortunately when
the car was launched here in the UK there were very
few suppliers of aftermarket back boxes (mufflers)
so it took me until late September to be able to
actually buy the exhaust I wanted. The exhaust in
question is the
RoadsterSport by
Goodwin Racing in the USA. Rather than arranging
getting one sent over from the US a few months
earlier I waited until September when they were
launched via the UK agents for Goodwin Racing,
MX5Mad.
The swap over was a
bit more complicated than I'd hoped as my old bolts
had rusted too much for me to get off. One of them
I managed to thread the nut, the other one got so
far off and sheared the bolt off. Not good. So the
old exhaust bolts had to be sawn off part way down
- rendering the old back box useless - or at leat until I can
drill out the old welded on bolts. Not a problem
though.
The new exhaust sounds superb, I am really happy
with it. The car now sounds like a proper sports
car, with a deep burble at idle and some lovely pops
on the overrun. It sounds great on WOT and has a
lovely roar to it. Well worth the money in my
opinion, and only added £20 in admin fee to my
insurance. Some users of the RoadsterSport exhaust have complained at a
'boominess' at certain revs. I've not found this at
all. Maybe a little bit when it was first on the
car. I have both baffles removed on mine (exhaust
comes with two baffles, one per tip to tailor the
sound to your needs) and find this works best for
me.
Incidentally the exhaust adds up to 8 hp to the
overall performance, it also shaves off 7lbs in
weight from the stock back box and in theory
delivers overall better fuel
economy - although that's debatable as I blip the
throttle more now to hear it burble, so my fuel
consumption hasn't improved!
For those interested
in the different exhausts available there are
various sound clips of the different exhausts
available here on miata.net forum.
Also, there's a very
short and very poor quality video clip of
my exhaust here on YouTube.
New Tyres - 12,000
miles
All four tyres were replace at about 12,000
miles with ever so slightly larger Goodyear Eagle F1
GS-D3's (215/45/17 instead of 205/45/17). These
tyres an old favourite tyre of mine that I had on
both my previous MX-5's. The size difference means
that they are 0.5" bigger in overall diameter,
this makes a 0.6 of a mph difference at 60mph - so
nothing to worry about :) Plus the slightly deeper
side wall fills the arches that bit better too!
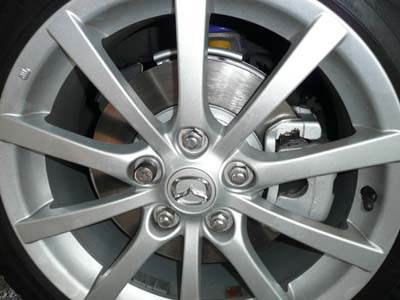 New
Brake Pads / Discs - 32,000 miles New
Brake Pads / Discs - 32,000 miles
New Mazda OEM brakes all round inc pads and discs -
also painted hubs/calipers/shields
Read
more about this here.
Even more mods
might be
coming soon....hopefully.
|